Category Archives: Bread

Scrumdiddlyumptious (Caramelized Banana & Toasted Coconut) Banana Bread

This recipe is brought to you by INSOMNIAbecause when you’re single and have the biggest exam of your life scheduled for Valentine’s Day 2014, this is as wild as the nights around here are gonna get.

Scrumdiddlyumptious Caramelized Banana and Toasted Coconut Banana Bread 11--013014

Thank goodness I stumbled across a simply scrumdiddlyumptious banana bread recipe that can make even 4 AM sleeplessness taste amazing. More about this bread in a second. (FUN FACT: The appellation ‘scrumdiddlyumptious’ was inspired by a friend who tasted some of this insanely moist and flavor-packed banana bread, but it’s also a nod to my first attempt to join the blogging world three years ago <–check it out if you’re interested…It’s almost crazy to think how far this blog has come since those days of phone food photos!)

Scrumdiddlyumptious Caramelized Banana and Toasted Coconut Banana Bread 18--013014

With my brain constantly kicked into over-over-overdrive these days (like, headache-and-insomnia-inducing overdrive!), it’s almost ridiculously comforting to do something that requires zero thinking. Just me, the Frozen soundtrack drifting in the background, and the therapeutic rhythm of your hand as it slowly swirls fragrant coconut and chocolate chips into a bowl of thick, creamy, chunky banana bread batter.

Scrumdiddlyumptious Caramelized Banana and Toasted Coconut Banana Bread 2--013014

Since I moved back and the time crunch has gotten crunchier than a jar of chunky peanut butter, life around here has been one huge mind-brain  (wow, I can’t believe I just typed that) mind-body disconnection. For example, as I was taking a post-dinner break and writing this blog post, I was simultaneously trying to spread peanut butter on a baby carrot. No biggie, right? I had just managed to get a sizable chunk of peanut butter out of the jar (think golf-ball-size per baby carrot–hey, these are stressful times! And stressful times = more peanut butter) when, by some trick of I-know-not-how, my spoon pressed down on the carrot and it shot out of my hand into the air. Before I knew what was happening, my hand flew at it with all the lightning speed of, well, lightning and stuff, snatched it out of the air like Peter Parker in this scene, and  all the while my other hand just went on spreading peanut butter on that damned carrot like nothing ever happened. And I just stood there for a full two minutes staring at my hands without processing what had just happened, while the little mound of peanut butter on my teeny carrot steadily expanded into the size of a tennis ball. And then at 2 minutes and 1 second, it suddenly hit me and I was all like, “Oh! That was REALLY COOL. Did anybody see that?!

Scrumdiddlyumptious Caramelized Banana and Toasted Coconut Banana Bread 5--013014

Why am I telling you all this? Beats me. I don’t even know if any of what I just typed  up there warrants comment. I just thought I’d share. Kinda like FYI in case you haven’t noticed, my brain is really scrambled up right now, guys. Your morning plate of eggs have got nothing on my brain–word.

Scrumdiddlyumptious Caramelized Banana and Toasted Coconut Banana Bread 14--013014

I suspect my scatterbrained-ness is partly because I took my first mock exam last week and my second one this morning, and I am absolutely pooped. Like, pretty happy to be done with that, especially since it went better than expected, and de-stressed enough to finally write another entry, but still so pooped. Pooped-er than dog doo-doo on your front lawn. Sorry.

Scrumdiddlyumptious Caramelized Banana and Toasted Coconut Banana Bread 8--013014

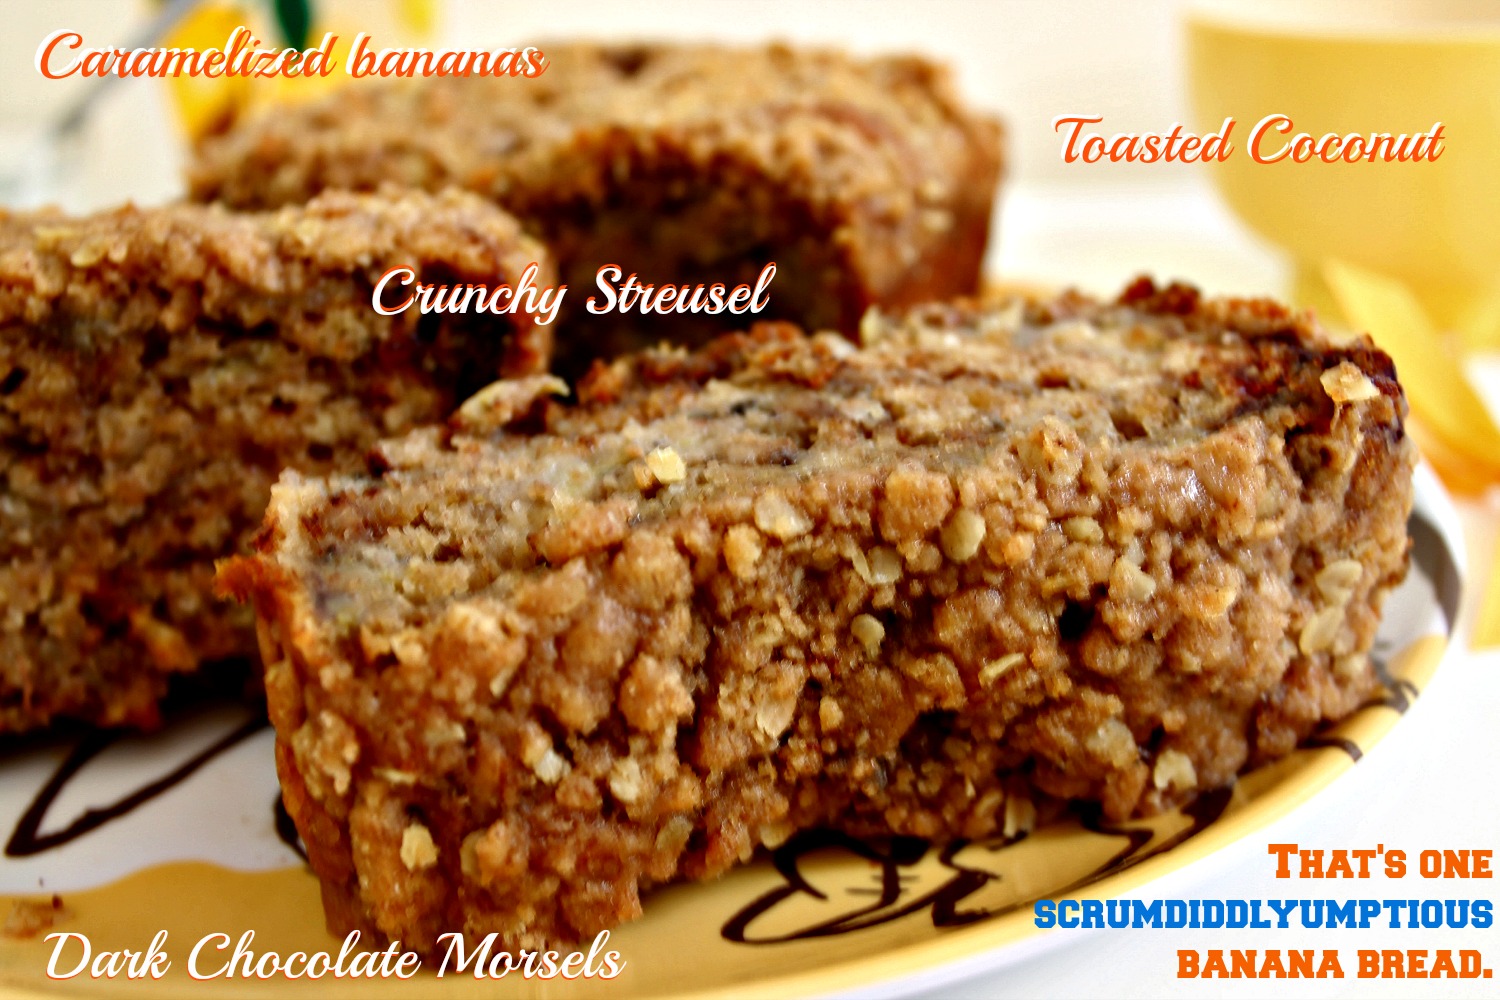
That leaves me with the one (hopefully) coherent point of this post: this scrumdiddlyumptious, unlike-anything banana bread. Because let’s be honest: there’s banana bread, and then there’s…sort of cannibalizing banana bread by caramelizing the bananas first, toasting coconut, throwing in a handful of dark chocolate chunks, and then smothering the top in a generous oat and brown sugar streusel. It may well be one of the BEST BANANA BREAD recipes/variations I have ever tried, period, and the Greek yogurt and oil combo keeps it incredibly moist. This bread is the one thing that has made any number of sleepless nights worth it, and I hope it’ll find its really special way into your life soon, too!

Scrumdiddlyumptious Caramelized Banana and Toasted Coconut Banana Bread 21--013014

^ If I could actually manage to fall asleep once in a while, I’m pretty sure that’s what would be happening. #truth

Ala

Scrumdiddlyumptious Caramelized Banana & Toasted Coconut & Dark Chocolate Banana Bread

(Adapted from Half-Baked Harvest)
Ingredients:

For the caramelized bananas:

  • 4 medium bananas, the riper the better
  • 2 tablespoons honey
  • 1 teaspoon cinnamon
  • 1 tablespoon brown sugar
  1. Preheat oven to 400 degrees F.
  2. On a foil-lined cookie sheet, lay out your peeled bananas and drizzle them with honey, cinnamon, and brown sugar.
  3. Roast bananas in preheated oven for 20-25 minutes, until they begin to caramelize and turn a deep golden brown. They should be very soft and easy to mush.
  4. Remove bananas from oven and mash them. Set aside to include in banana bread recipe, Step 4.

For the banana bread:

  • 2 eggs, room temperature
  • 1/2 cup brown sugar
  • 1/2 cup Greek yogurt (I used 0%–you may use any type of Greek yogurt OR canned coconut milk)
  • 1/2 cup canola oil (you may use melted coconut oil)
  • 1 teaspoon vanilla extract
  • 1 3/4 cups all-purpose flour
  • 2 teaspoons cinnamon
  • 1 teaspoon baking soda
  • 1/2 teaspoon salt
  • 3/4 cups dark chocolate chips (you may sub any type of chips you have on hand)
  • 1/2 cup coconut flakes, toasted

Directions:

  1. Reduce oven temperature to 350 degrees F. Lightly grease a 9×5-inch baking pan and set aside.
  2. In a large mixing bowl, whisk together eggs and brown sugar.
  3. Mix in Greek yogurt and oil.
  4. Stir in mashed bananas (see Caramelized Bananas recipe, above) and vanilla.
  5. Add flour, baking soda, and salt. Mix in until just incorporated.
  6. Gently fold in chocolate chips and coconut flakes.
  7. Top with oat streusel (recipe below).
  8. Bake in preheated oven for 50-60 minutes. Check your banana bread for doneness with a long toothpick that will reach all the way to the bottom of your loaf pan–it should come out with moist crumbs attached, at which point your bread will be ready to come out of the oven! (Note: be sure to double-check if your toothpick encounters chocolate–the chocolate will be melty, but your batter may already be cooked through.) Allow to cool in pan for 15 minutes before removing to cool completely on a wire rack.
  9. Scrumdiddly-slice and serve it up!

To make oat streusel: 

  • 1/3 cup all-purpose flour
  • 1/4 cup brown sugar
  • 1/4 cup white sugar
  • 1/4 cup quick-cooking oats
  • 2 teaspoons cinnamon
  • 1/4 cup cold butter or margarine
  1. In a medium bowl, mix together all ingredients except butter.
  2. Cut in cold butter with a fork, until your streusel consists of many pea-sized lumps of sugary-floury-buttery goodness. Use to top banana bread batter in banana bread recipe (Step 7).

Will Cook For SmilesTuesday Talent Show Link Party at Chef in Training! It is held weekly and has some amazing link ups!

18 Comments

Filed under Baked Goods and Desserts, Bread

Honey Sweet Rolls

Honey Sweet Roll gif 1

I, like every reasonable person, am extremely fond of excuses. I love excuses because they can come in a variety of forms. Observe.

Please excuse these honey sweet buns. I’m sure your boss didn’t even notice you salivating, so you can wipe the drool off your keyboard and continue browsing these pictures at your leisure–er, or discretion.

Honey Sweet Rolls 1--050113

You will also need to excuse my lack of consideration in posting yet another fluffy yeast-filled gif that makes you wish they’d hurry up and figure out a way to make the stuff you see on your computer screen edible. 

Honey Sweet Roll gif 2

Passionate advocate for all victims of first-world problems–that’s me. I should seriously consider a career change.

Honey Sweet Rolls 4--050113 Honey Sweet Rolls 7--050113

Some excuses make me want to eat my words. For instance, I am about to offer you an excuse about why I haven’t been updating recently. The excuse is called a nasty bout of food poisoning followed by a feverish round of stomach flu. The sight and smell of food for the past week made me feel like poor Grimsby on board Prince Eric’s ship. I did not want to eat food, or my words, or anything else.

Honey Sweet Rolls 10--050113

The one thing I did crave when my symptoms started to subside was bread. Plain, slightly sweet and incredibly fluffy buns were in order, and I was at the same time suffering from a drastic case of kitchen withdrawal by this time. As soon as I could stand on my two feet again, I ran straight for the oven.

Well, I sort of ran more into the oven. And I was a complete hazard because I could barely see straight at this point. If I had to hashtag my miserable baking experience, it would look like

#THETHINGSIWILLDOFORATASTEOFTHISBREAD

or #BURNTFINGERSNOBODYGOTTIMEFORDAT.

Honey Sweet Rolls 5--050113Honey Sweet Rolls 11--050113

Ain’t nobody got time for your excuses about why you’re not in the kitchen right now baking up this bread, either! This dough is extremely simple to work with and yields a chewy, light, and satisfyingly sweet roll that will turn your oven into a first-class bakery. I’ve eaten this all week slathered in PB&J, but it’s fabulous on its own or with a modest pat of butter as well. And of course, you’ll want to toss it in the microwave for a few seconds after the first day so you get that warm, fresh-from-the-oven softness!

Honey Sweet Rolls 14--050113

So what are you waiting for? No more excuses, kiddos. This bread is the new Chuck Norris, and you’ll have to try it yourself to believe it.

And yes, it’s good to be back to eating–erm, writing. 🙂

Ala

Honey Sweet Rolls
Original recipe from Averie Cooks, who knows what she’s doing
Ingredients:
  • 1 cup water, warmed to ~130 degrees F (slightly hot to touch but not so hot it will scald your skin)
  • 1 packet (2 1/4 teaspoons) instant dry yeast
  • 1/4 cup white sugar
  • 1 large egg
  • 1/4 cup honey
  • 3 tablespoons oil
  • 1/2 teaspoon salt
  • 3 3/4 to 4 cups flour (bread flour will yield chewier + lighter results; I used APF and it was still pretty fluffy)
  • 2 tablespoons butter, melted
  • 2 tablespoons honey

Directions–from Averie’s site:

Add water to a glass measuring cup or microwave-safe bowl and heat on high power to warm it, about 30 seconds. Testing with a thermometer is highly recommended, but if testing with your finger, water should feel warm but not hot.

To the bowl of a stand mixer fitted with the paddle attachment, add the water and sprinkle the yeast on top of it. Beat on low speed for about 10 seconds, just to combine; let mixture stand for 10 minutes.

Add the egg, 1/4 cup honey, oil, salt, and mix until well-combined, about 2 minutes on low to medium-low speed. Add 3 cups flour and beat until a sloppy, wet, loose dough forms. Scrape off any dough bits stuck to the paddle, remove the paddle attachment, and put on the dough hook.

With the dough hook attached, turn mixer on low speed, and slowly sprinkle in remaining 3/4 cup flour. If necessary to obtain soft, smooth, non-sticky dough, sprinkle in the full 1 cup flour that remains (for a total of 4 cups flour, rather than 3 3/4 cups, noting that the more flour used, the denser the finished rolls will be). Knead dough for about 8 minutes. It will be firm, smooth, not sticky, and elastic. Turn dough out onto aSilpat Non-Stick Baking Mat or floured work surface and knead dough by hand for 1 to 2 minutes, just to get into the nooks and crannies with your fingers the dough hook may have missed and make sure dough is very smooth and uniform in texture. Place mounded ball of dough in a cooking sprayed or lightly greased large bowl and cover with plasticwrap. Place bowl in a warm place until it has doubled in size, about 2 hours. Tip – Preheating your oven for 1 minute to 400F, then shutting it off (make sure you shut it off), and quickly sliding the bowl in so the hot air doesn’t escape is one way to create a warm environment; think 85 or 90F summer day warm environment. A cooler environment simply means dough will take longer to rise.

After dough has risen and doubled, punch it down to release the air bubbles, and turn it out onto a Silpat or floured work surface. Knead for about 1 minute. Mound dough into a ball, place it back into the bowl, cover it, and allow it to rest and relax for about 10 minutes, making it easier to shape into rolls.

Prepare a 9-by-13-inch baking pan by lining it with aluminum foil, spray with cooking spray; set aside.

Place dough on Silpat or floured work surface, and using your hands, roll it into a long cylinder shape, about 12 to 15 inches in length, and it will about 3 to 4 inches in girth. Divide the log into 12 uniformly-sized pieces with a dough cutter or sharp knife. Roll each piece into a ball, creating surface tension on the top of the ball by stretching the dough over itself a bit and pinch off the bottom, tucking the dough into itself. Place each piece into the prepared pan, seam side down, uniformly spaced, four rows by three. (Dough may also be rolled into just a simple ‘plain ball’, without pulling on the top surface of dough to create tension and not bothering to pinch off the bottom a bit, but I find they rise better and are fluffier if they’re pinched off rather than just round dough globes)

After all pieces are in the pan, cover it with plasticwrap and allow to dough to rise for about 30 minutes. While dough rises, preheat oven to 400F. A good place for this rise is placing baking pan on the stovetop while oven is preheating for the carryover warmth.

Prepare honey-butter mixture by melting butter in a microwave-safe bowl on high power, about 1 minute. To the melted butter, add 2 tablespoons honey and stir to combine; set aside. After the rolls have risen and before baking, brush tops and sides of dough with the honey-butter mixture, getting into the sides and crevices and with a pastry brush. Bake rolls for about 15 minutes or until golden; they bake up very fast and watch them closely so the honey-butter mixture doesn’t burn in this very hot oven. Allow rolls to cool before serving. Serve with Honey Butter or Cinnamon-Sugar Butter


14 Comments

Filed under Baked Goods and Desserts, Bread

Classy Overnight Blueberry French Toast

Blueberry Hawaiian Sweet Bread Toast 1--012713

Every once in a while, something happens in our lives that makes us put the gear in park, turn off the ignition, and just wonder.

Blueberry Hawaiian Sweet Bread Toast 2--012713

I consider myself a fairly happy-go-lucky person. I am, after all, a hybrid donut and crepe type on my Breakfast Breakdown of Personality Types. That’s not my gushing description when I step into the interview room, but gloomy funks and I don’t mix-‘n-match well. For better or for worse, I am no Eeyore.

Blueberry Hawaiian Sweet Bread Toast 4--012713

Without getting into too much detail here–the story is long, weighty, and (only for the purposes of my musings here, though certainly not personally) irrelevant–someone close and dear to me is suffering. I flew home suddenly this weekend when I heard the news, and while I’d love to say that it hasn’t thrown a complete wrench in what has already been a particularly rough school term–the wrench has definitely been chucked, toolbox and all.

I found it difficult to teach on Friday, when I was being observed by the professor in charge of teaching assistants. I’m finding it even more difficult to concentrate now, when I know I should be working and then the cycle creeps in.

Oh, come on–you know the one!

Blueberry Hawaiian Sweet Bread Toast 5--012713

It looks something like:

Emotionally unstable –> stress bakes instead of works –> stuffs face with freshly baked goods –> gets gloomy over indulging in so many cookies or pastry of your choice –> even more emotionally distraught –> throws shoe against wall in frustration –> makes hole in wall –> goes to fix wall instead of work –> ginormous pile of work going, “You’ll never finish me nooooooowwwwwww” –> despair dresses up in an all-consuming black hole costume.

And so on. With minor tweaks along the way.

Blueberry Hawaiian Sweet Bread Toast 7--012713

Despite my moment of Eeyore-like indulgence here, though, one thing that this past month has really brought to the forefront is just the undeniable fact that I am so, so incredibly lucky. Sure, I caught the flu last month.

Does it feel like the end of the world? Heck yes. Especially when you’re wading through piles of papers and the fever invading your entire body is screaming, “It’s time for a BONFIRE, people!”

But is it really the end of the world? No. No, no, so incredibly no.

Blueberry Hawaiian Sweet Bread Toast 8--012713

So I’m taking things one step at a time now, and I’m going to advise that you do, too. Wake up early. Make breakfast for your loved ones. Tell ’em you love them while you’re doing it, too. This delicious, from-the-heart baked blueberry french toast recipe could be a good way to start.

So before I go, one more word from me: I send my love to you all, dear readers! You all mean so much to me, and you deserve to know it.

Have you told somebody you loved them today?

Ala

Tuesday Talent Show Link Party at Chef in Training! It is held weekly and has some amazing link ups!

Classy Overnight Blueberry French Toast
Adapted from Allrecipes
Ingredients:
  • 8 sweet Hawaiian rolls, cubed (I used King’s Hawaiian 12-dinner roll pack)
  • 4 oz. cream cheese, softened
  • 1/3 cup fresh blueberries
  • 2 eggs, lightly beaten
  • 1/3 cup milk
  • 1 1/2 tablespoons maple syrup
  • 1/2 teaspoon ground cinnamon
  • Splash of vanilla extract

Directions

  1. The night before: Lightly grease a 9×9-inch round baking pan (or any pan of similar dimension–a square 8×8-inch pan would work fine). Arrange half of the bread cubes in the bottom of the dish; spread softened cream cheese on top, then sprinkle with fresh blueberries. Top with remaining bread cubes.
  2. In a bowl, combine eggs, milk, syrup, cinnamon, and vanilla. Pour over bread, pressing in cubes so that all of them are fully soaked. Cover and refrigerate overnight.
  3. Remove pan from fridge 30 minutes prior to baking. Preheat oven to 350 degrees F.
  4. Loosely cover baking pan with foil and bake in preheated oven for 25-30 minutes. Remove cover and continue baking for an additional 20-25 minutes, until center is fairly firm and surface is golden brown. Serve warm with maple syrup.

4 Comments

Filed under Baked Goods and Desserts, Bread, Breakfast & Brunch

Apple Pie Streusel Bread

THIS POST IS DEDICATED TO APPRECIATING THE EDUCATORS AND TEACHERS IN OUR LIVES.

This has an embarrassing amount nothing to do with the fact that I’ve just started teaching an undergraduate course.

Have you ever had a teacher you respected to the core?

Like an apple core–you know, strong, sturdy, and full of so many little seeds of great ideas?

Now that I’m a full-fledged apple-core teacher of sorts, I’ve also crowned myself queen of magnificent metaphors. Because apparently everything I says actually has weight now, or at least so I’ve gathered from the fact that every ounce of word vomit that spews forth from my lips is written down by a dozen zealous pen-wielding university undergrads.

Funflour Fact #7: Did you know that (according to http://www.fotps.org) the average teacher…a) Spends an average of $443 per year of their own money to meet the needs of their students, and b) spend an average of 50 hours per week on all teaching duties, including non-compensated school-related activities such as grading papers, bus duty and club advising? 

Teachers have been on my mind a lot lately. Just last week, I graded my first full batch of papers and nearly flew off my rocker at the sheer amount of work that goes into such a seemingly “simple” task.

Probably the only thing we got right about our teachers when we were still little bright-eyed brats was that they basically live in their classrooms. I’m stuck in my office at 9 PM as I type this, but I guess that’s about the same thing. And until I started teaching this fall term, I never really–I mean really–appreciated how much our teachers have done and continue to do for us.

Just this morning, I attempted to channel massive levels of anxiety into productive writing energy for nearly half of my students, whose second paper is due this week. We had quite a few tightly-wound strings and lots of near-hyperventilation moments.

Wallflour Power: Don’t wait until it’s too late–show somebody important in your life that you care by making something special for them when there’s no official “occasion.” (This apple pie streusel bread could be a great start!)  

I will be keeping my paper bag handy at my desk from here on out…right next to the Costco-sized packs of tissue boxes.

I will also need to keep a loaf of this apple pie bread around, because apparently it is a total balm for the soul. So I was told…after my friends inhaled it in one round. On second thought, maybe I’ll just save some for myself so that they’ll actually have a sane instructor when they come to talk to me.

Lots of people can point at the education debate and say that teachers don’t do their jobs, that the government “supports” education when the legislation and history says otherwise, and all sorts of crazy stuff. If you’ve ever been in a teacher’s shoes, though, you’ll know just how dedicated these people are.

So this is a post in honor of all you teachers out there–dear teeches, we appreciate you!!

Here’s one for all the appreciated teachers in your life: apple pie bread, everyone. Print this, and show a teacher how much you appreciate them today!

(This post was also part of the October Improv challenge at Frugal Antics–blog hop!)

Which teacher in your life has made the most lasting impression on you, and why?


get the InLinkz code

Apple Pie Streusel Bread
Yield: 1 loaf
Slightly adapted from My Baking Addiction
 
Ingredients:

For the Batter

  • 1/2 cup unsalted butter or margarine, softened
  • 1/2 cup granulated sugar
  • 1/2 cup lightly packed brown sugar
  • 1/4 cup buttermilk
  • 2 teaspoons baking powder
  • 2 eggs
  • 1 1/2 teaspoon vanilla
  • 2 cups Gold Medal all-purpose flour
  • 2 teaspoons cinnamon
  • 1/2 teaspoon ground nutmeg
  • 1/2 teaspoon salt
  • 2 cups peeled apples, diced (approximately 3-4 medium apples)
  • 3/4 cup chopped pecans OR graham crackers, lightly crushed (not too finely) into small pieces
  • 1/2 cup raisins

For the Streusel Topping

  • 1/4 cup lightly packed light brown sugar
  • 2 tablespoons all-purpose flour
  • 1 teaspoon cinnamon
  • 2 tablespoons butter or margarine
  • 1/4 cup quick-cooking oats
  • 1/4 cup chopped pecans

Directions:

  1. Preheat oven to 350 degrees F. In a large bowl, cream butter or margarine until fluffy. Add sugars; blend until well-combined and creamy. Add buttermilk and baking powder; mix until combined. Add eggs and vanilla, beating until thoroughly incorporated.
  2. Gradually add flour, cinnamon, nutmeg, and salt, and mix until just incorporated. Fold in apples, pecans or graham crackers, and raisins. Spoon into a prepared greased 9×5″ loaf pan.
  3. For the streusel: In a medium bowl, combine sugar, flour, cinnamon, oats, and pecans. Cut in butter or margarine until mixture resembles a coarse meal. Spoon evenly on top of batter. Bake entire bread for 55-65 minutes, or until a toothpick inserted all the way through comes out clean. Cool for 5 minutes before transferring to a wire rack, and cut when completely cooled.
  4. The final (and most important!) step: serve this to a teacher or instructor in your life whom you appreciate!

14 Comments

Filed under Baked Goods and Desserts, Bread, Fruit Desserts

Pineapple Custard Coconut “Bun” Breakfast Braid

Before I get started on anything else, I wanted to let you all know for what fabulous occasion I made this (equally fabulous, if I say so myself) breakfast braid. If y’all don’t already know her, Julie from Willow Bird Baking is hosting her first challenge series ever and all of you should join! She’s fantastic. This week’s challenge is breakfast braids. And at the risk of exposing you to yet another countless hours logged browsing awesome blogs, I’m sending you on over there to check it out.

Do it.

Admit it–it sounds better to you than washing that pile of laundry glaring at you from the corner of your room.

So about this pineapple custard coconut bun.

Breakfast braid.

Hybrid thing.

Have you ever had a Chinese pineapple bun before? I’ve always wanted to try this recipe from Christine’s site, but a) I haven’t quite worked up the courage to make “fluffy” pastries yet, and b) I’m scared (read: terrified) out of my size who-knows-what pants even thinking about replicating a food that I grew up eating.

Because usually it ends up with my parents poking at it and going, “Ehhh, why you make this? Give up and buy from store already. Much better.”

Okay no, my parents don’t have absurdly martian accents. I just like to add them in for effect, sort of like I adopt a really corrupt British accent every time I imitate the snooty people I occasionally encounter in my department, even though I’m pretty sure all of them popped out of the womb singing “America, The Beautiful.”

It doesn’t really make sense. Neither do a lot of things in my pell-mell life, and neither do these hybridized, slightly mutant buns/bread that are deliciously awesome.

What’s special (or what I’d like to think is special) about them is that actually combine three awesome foods and jam them into one crazy concoction that actually resembles edible sustenance. We have, of course, the requisite breakfast braid base for the challenge, but I wanted to put an Asian spin on the whole ordeal. I love Chinese baked goods, and I love working with them when my martian parents aren’t around to poke fun at me, so it seemed natural to work that flair into this challenge.

I can just imagine my mad fantastic Zumba instructor screaming it at me now. Work it, girl–work those buns!!

So I stuffed it with my favorite filling from these traditional cocktail buns–and then, instead of your conventional breakfast braid icing, I jammed on a hunkin’ layer of the sweet “pineapple” layer from pineapple buns on top.

(For those of you who have never eaten a pineapple bun: first, we need to fix that. Second, the bun gets its name from the pineapple pattern this layer forms on the bun post-baking, rather than any actual pineapple ingredient in the bun itself. I usually peel this part off and eat it while sneaking away in triumph. It is, unquestionably, the best part of the pastry.)

But then again, maybe it’s a good thing not all of you know about it. More for me.

One final, CRITICAL note, and then I’ll shut my selfish trap.

If you make this recipe, read this carefully: Make sure you leave a piece for me.

I am in the process of grading the last batch of papers from our first round of essays, and I need edible renumeration for my pains.

Shipping address available upon request.

That is all. Now go work those buns.

Pineapple Custard Coconut “Bun” Breakfast Braid
Yield: 1 medium braid
 
For breakfast bun braid:
Adapted from Willow Bird Baking

Ingredients:

  • 1 cup all-purpose flour
  • 1/2 teaspoon baking powder
  • 1/4 teaspoon salt
  • 1/4 cup butter or margarine, softened
  • 1.5 ounces cream cheese OR 1 ounce tofu + 2 tablespoons plain yogurt*
  • 1/4 cup milk
  • 1/4 teaspoon vanilla extract

Directions:

  1. Preheat oven to 400 degrees F. In a medium bowl, combine flour, baking powder, and salt. Cut in softened butter or margarine, as well as cream cheese (or substitute–see note below) and mix until a sort of coarse meal forms.  Add milk and vanilla, and stir until a very loose dough forms. Be sure not to overmix–doing so might turn your pastry dough from a rocking good pastry to a plain old rock!
  2. Turn out onto floured surface and knead very gently about five or six times, until your dough just comes together. Julie notes that it will be a very rough dough at this point, and that this is “perfect” for our purposes! Roll out into a rectangle about 5″ by 10″–just as long as it’s not too thin, you’ll be good to go.
  3. In the vertical middle third of your dough, spread coconut custard filling (see below for instructions). Then, along each side, make diagonal cuts (all in the same direction) about 1.5-inch in length and 1-inch apart from each other. Starting on one side, carefully fold one of the strips over the filling, then fold the matching strip from the other side. Continue folding until a braid is formed. Ta-da! Not so bad, was it?
  4. Top with pineapple layer (see below for instructions) and brush with egg wash (see below for instructions). Bake in preheated oven for 14-18 minutes, or until your top pineapple layer becomes golden. Allow to cool slightly before serving–the filling will be hot!

*Note on cream cheese substitute: I’m offering my cream cheese substitute because I do a really good job of not checking all of my supplies beforehand (d’oh) and didn’t have a package on hand. The tofu and yogurt will do the trick if you’re making small batches like I did; however, if you’re making a full-on breakfast honkin’ braid, it’s probably best if you use the cream cheese like a normal responsible  human being.

For the coconut custard filling:

Adapted from Christine’s Recipes

Ingredients:

  • 2 tablespoons butter or margarine, softened
  • 3 1/2 tablespoons white sugar
  • 1/4 egg, beaten (hold on to the rest of the egg–it’s going into your pineapple topping!)
  • 1/3 to 1/2 cup shredded sweetened coconut

Directions:

  1. Combine butter and sugar. Mix until light and fluffy.
  2. Stir in egg. Add coconut and stir in until just combined.
  3. Place mixture in fridge for at least a few minutes before using it, if possible; this will make it more manageable.

For pineapple bun topping:

Adapted from Rasa Malaysia

Ingredients:

  • 2 tablespoons butter or margarine, softened
  • 1/3 cup and 1 tablespoon powdered sugar
  • 1/2 teaspoon vanilla extract
  • 1/2 egg, beaten
  • 1/2 cup and 2 tablespoons all-purpose flour

Directions:

  1. Beat butter or margarine, sugar, and vanilla until fluffy and light. Add in egg. Fold in flour.

For egg wash:

  • Use remaining 1/4 beaten egg and brush onto pineapple-topped breakfast braids immediately before baking.

19 Comments

Filed under Baked Goods and Desserts, Bread

Pumpkin Cinnamon Pull-Apart Bread

Ever feel like you’re being pulled apart by the seams from all the stress?

You know…the stress that always seems to converge on the very spot on which you happen to be standing at any given moment? That stress?

I feel that way all the time. Fortunately, this bread does, too. And I always say that there’s nothing better than food that understands exactly what you’re going through.

With the minutes ticking down to the first day of the school term, I can already feel the jitters creeping up all around me, as if someone’s broken into a museum of entomology and set loose all the live specimens.

I didn’t want to bog down this (truly wonderful!) post with my pre-term anxiety, but I’ll get to this amazing recipe in a second. Pinkies! But there are some major changes going on this autumn that make it different from the rest.

First off, I’m going to be teaching this year! Scary, right? Anybody who has ever been a teacher, thought of becoming a teacher, known a teacher, or had a teacher (all right, do we have everyone on board now?) knows at least something of how nerve-wracking it must feel to get up in front of an entire classroom for the first time.

Sure, I’ve been a teacher and workshop instructor before. This past summer, I taught enrichment high school writing and media classes that totally sucked up my life and threw my soul back bright and shiny new–that lesson planning does some major buffing on your self-esteem! I had a total blast, and I know I will be fine as soon as I set foot into the classroom and actually get this teaching gig on the road.

But.

Until then.

Did I mention that the kids (I say “kids”–I mean “people who are probably an average of 1-3 years younger than me; in many cases, they may be older) are all college-age? My parents tell me that it’s one kid teaching another kid.

They’re probably completely right. They were right about, well, pretty much everything else growing up! Except for my being allergic to chocolate, grass, and shellfish. They lied about those. But I guess they knew they were lying, so they weren’t really wrong, either. I adore my parents–they make everything so much more interesting.

Flour Power: When you’re feeling down, try going to the store and picking up something fresh that you’ve never used before! Then try making a new recipe with it. I did this with fresh basil this past Thursday and made basil almond pesto, and it turned out great–nothing like a refreshing success to perk up your day! Recipe to come soon!

On a brighter note, I’m teaching a subject I love–animals in literature!–which is completely jiving with my emphasis in children’s literature, so I’m very excited for that.

Losing sleep is my major way of coping with things. Combine that with mild loss of appetite (not that you could probably tell with the flood of recipes that are about to sweep your way!) and general immune system blah-ness, and you have a grand old way of starting off a new school year. I’m keeping my fingers crossed, though–wish me luck! I can fight, too, Sore Throat, thanks.

The other big change is one I just found out about today–my roommate is moving out! And we’re not talking about your-contract-is-up-thanks-buh-bye moving out. We’re talking “some anxiety about living so close to campus and working so hard at the library all the time and needing some space off-campus” moving out!

Funflour Fact #3: Did you know that Mel Gibson plays the voice of John Smith in Pochahontas? Erm, yeah. I used to love John–now, not so much…..

I’m going to miss her. It makes me so sad when I can’t help ease the anxiety of someone who’s close to me, but I understand why she had to work this one out on her own. To some extent, it probably doesn’t help that we’re in the same graduate program (although I’m also going to miss being able to come back and blow some steam about things happening with our people). We’re both extremely hard workers and very tough on ourselves–not to mention we’re kind of twins, since we both (and her identical twin! and her dad!) have the same birthday–and I guess always having someone else around for comparison can be difficult.

I know it’s hard on me sometimes. I’m naturally a very competitive person–sometimes I compete with the people next to me on treadmills…and they don’t even know it. I find it both hilarious and super, super ridiculously necessary sometimes. And while I know I’ve been struggling to keep this out of my life and the lives of those around me, I can only imagine that she’s feeling anxious sometimes by the comparison, too.

At any rate, this was supposed to be my gushing about this recipe I found on Julie’s blog post–and it still is! GUSH GUSH GUSH thisisamazingyouNEEDtotrythisandthenshoweverybodyelsetoo–but the jitters were eating up my brains. I made this pumpkin cinnamon pull-apart bread yesterday morning for a dinner and it was absolutely devoured. Thank goodness we all still have the good ol’ reliable kitchen! The only bad things that happen there are that you made too many cookies and have to eat them all by yourself.

I’m still very excited for this upcoming quarter, and what better way to kick it off than a 1.5k open water swim for a breast cancer foundation tomorrow morning?

Any big changes happening in your life soon? This isn’t a one-woman show, and I’d love to hear all about them!

Happy reading, and happy eatings, y’all! (Gosh, I haven’t said that in forever! It feels good to say it now :] )

Pumpkin Cinnamon Pull-Apart Bread with Cinnamon Vanilla Glaze
Yield: 1 loaf
Adapted from original recipe: Julie @ Willow Bird Baking
 For the Pumpkin Cinnamon Pull-Apart Bread:
Ingredients:
  • 2 tablespoons butter
  • 1/2 cup milk
  • 2 1/4 teaspoons (1 envelope) active dry yeast
  • 1/4 cup white sugar
  • 1 teaspoon salt
  • 3/4 cup pumpkin puree
  • 2 teaspoons ground cinnamon
  • 2 to 2 1/2 cups all-purpose flour (see directions)

Directions: 

  1. In a saucepan over medium heat, brown your butter. (Note: This will take anywhere from 30 seconds to 1 minute; make sure you swirl your butter around occasionally, or certain areas will start to burn before the whole thing’s evenly browned. You’ll want to look for a deep golden brown color to tell that it’s done.) Pour into a heat-safe bowl and set aside.
  2. Meanwhile, in the same saucepan, heat up milk until it bubbles. Pour into bowl along with butter, and allow the mixture to cool until you can place your pinkie finger in it comfortably for a few seconds, but not much longer than that. (If your liquid is too hot to leave your finger in, its heat will kill the yeast. Conversely, if it isn’t hot enough, your yeast won’t be able to rise properly.) Add sugar and yeast. Stir in until sugar dissolves completely, and wait for 10 minutes. Your yeast should produce a foam–this shows that your yeast is active and ready to go! If you yeast does not foam, you’ll have to throw out the batch (sorry!) and try again with fresh yeast.
  3. Add salt, pumpkin, cinnamon, and 1 cup of flour to the mixture; combine ingredients well. Add an additional 1 cup flour (half a cup at a time works best) and stir well between each addition until flour is just incorporated. Your dough should be only slightly sticky when it’s ready to be kneaded, so you’ll want to use your own judgment here about the remaining 1/2 cup of flour. (You’ll be flouring your board, too, so there will be extra flour incorporated during kneading.)
  4. Flour your cutting board and turn out dough. Knead for 6-8 minutes by pulling your dough outwards (away from you, taking care not to break it) and folding it back in on itself. Turn dough a quarter of a turn and repeat until poking two fingers into the dough leaves two impressions that hold their shape. At this point, your dough will be done, so place it in a greased bowl and cover it with a damp cloth. Place in a warm spot (I usually turn on the heat for 5 seconds in my oven and then turn it off before putting in the dough) and allow to rise for about 90 minutes, until doubled in size.
  5. Refrigerate for 6 hours or overnight. (You may skip this step if you’re pressed for time, but I find that the overnight fridge visit really helps give your bread that extra lift!)
  6. Roll out dough on cutting board into an approximately 16″ x 10″ rectangle, or until 1/4″ thick. Lift dough carefully occasionally with one supporting hand under the middle to prevent sticking. When you’ve rolled out your dough, follow instructions for cinnamon sugar filling (below–i.e. brush on butter and filling).
  7. Cut dough into sixths lengthwise, then cut again into sixths vertically. Carefully stack dough pieces and place them horizontally across a greased loaf pan; squish in the pieces gently so that they all fit. (During baking, they will expand and not come out in a perfect row, which is perfectly fine! We had lots of fun peeling the pieces off from every which direction.) Cover with damp cloth again and allow to rise 30-45 minutes, or until doubled in size, in a warm place.
  8. Preheat oven to 350 degrees F. Bake bread for 30-35 minutes, until a dark golden brown. You’ll want to check all areas of the bread with a toothpick to make sure it’s done–if the toothpick comes out clean when inserted completely, your bread is done!
  9. Prepare glaze (see below) and serve over warm bread. Kick up some fall pizzazz (maybe some apple cider!), and pull away!
For Cinnamon Sugar Filling:
Ingredients:
  • 2 tablespoons butter
  • 1 cup granulated sugar
  • 1 tablespoon ground cinnamon
  • 1/2 teaspoon ground nutmeg

Directions: 

  1. In a saucepan over medium heat, brown butter. Set aside to cool. In the meantime, combine remaining three ingredients in a separate bowl.
  2. Brush cooled butter over flattened dough, then sprinkle cinnamon-sugar mixture over the butter so that most of it sticks. (Note: Despite having read about Julia’s squeamish reaction and eventual conclusion that the truck-load of sugar is not an insanely exorbitant amount, I still blanched when I came to this step. Don’t! You can trust these amounts, and nobody else needs to know how much sugar you’re feeding them.)
 For Cinnamon Vanilla Glaze:
Ingredients:
  • 1/3 cup confectioner’s sugar
  • 2 teaspoons ground cinnamon
  • 1 tablespoon milk, with additional as needed
  • 1 teaspoon vanilla extract
  • 1 tablespoon butter, melted

Directions:

  1. Combine all ingredients and stir until smooth. Pour over warm bread with some sass and sizzle, and serve immediately. Enjoy!
 

5 Comments

Filed under Baked Goods and Desserts, Bread

National Eat Dessert First Month Challenge Day 4: National Chocolate Chip Day

It’s the third day of National Eat Dessert First! Month, an entire 31 days dedicated to a different themed dessert but, more importantly, getting those desserts onto our plates and palates! Each day will feature a new guest chef’s photos and recipes for each theme. If you’re interested in joining in for a dessert-tastic month, read the details at the Dessert Month Challenge post. It’s never too late to start!

Our delectable Day 4 entry features mavinmaverick, who has whipped up an absolutely fantastic and classic banana chocolate chip bread recipe in honor of this staple ingredient’s day.

BANANA CHOCOLATE CHIP BREAD

Courtesy of: Mavin Maverick

Source of original post: Here

Original Post:

Okay, as promised, here is my recipe of the day. I had several chocolate chip related recipes, so I had to figure out which one I wanted to do; cookies? fudge?…Ahhh…Banana Bread! So, without further ado, here is my creation. And yes, we did sample this before dinner. MWAHAHAHAHAHA!!!!!!

I figured since the day was about chocolate chips, I would take a picture of the batter before the chips were mixed in:

And here is what it looked like after all was baked and done. This made two loaves, because I only have a couple of small loaf pans, but the recipe calls for one larger pan. Keep that in mind if you want to make it!

And here is the recipe! Continue reading

2 Comments

Filed under Baked Goods and Desserts, Bread, Brownies & Chocolates

Panda (Devil) Bread

It’s like a Rorschach test–quick! What do you see?

Yup, it’s a panda all right! I knew you’d guess it.

…Okay, I admit–it does look sort of possessed. But at least it’s a possessed panda, right? That could potentially still be cute. Its pet name is Frankie the Panda (Devil) Bread loaf.

How did this Shelley-esque nightmare come into being? Let me tell you…

Our story begins on a cold, stormy winter night, when the wrath of the oven gods decided to wreak their havoc and get revenge on the mortals below…so they sent…

PANDA DEVIL BREAD!! Muahahaha!

The end.

Good story, no?

This bread actually emerged from a skewed desire to make something unbearably cuddly and cute for our weekly book club. I’m hosting this week, and so setting aside for a moment the slightly bizarre inclination to eat the face of an endangered animal for lunch, I decided to make this recipe.

Did it turn out the way I wanted? Probably not. But I still think it makes an adorably possessed panda, don’t you think? I’m having my second slice for lunch today with hummus and Greek yogurt, and I’m so looking forward to it. Plus, it’s (surprisingly) one of the best white (or green) bread sandwich loaf I’ve ever made. Soft, airy, slightly chewy, and just a tad of that nice firmness on that outer crust.

Unlike some food bloggers who put out only the very best of their work–we all know those beautiful, amazing photos of jaw-dropping cakes and who-knows-what-went-into-that-cream-puff–I don’t mind sharing, not recipes for disaster, per se, but my own disastrous encounters with good recipes. In fact, I think it’s more fun that way. Possessed panda bread instead of cute, cuddly panda bread–why not, right?

And if you’re still in doubt as to Frankie’s devilishness, take a look at this snapshot from the center of his loaf:

Hehe, that’s my favorite one. Frankie in all his center-of-loaf glory. You can even see the horns sticking out of his cuddly panda head, aww.

Anyway, the girls at the book club will be eating this today while we discuss the Rootabaga Stories written by Carl Sandburg, which is appropriate since they’re children’s nonsense stories, and my bread is nonsense bread.

If any of you want to make nonsense bread, or actually attempt to make this bread the right way (although, until I do so myself, I’m going to be naturally inclined that think that “normal” is overrated), visit the original recipe translation at this site!

When I make this bread again–and I will definitely do that, since the bread is worth eating even if it’s not necessarily aesthetically pleasing–I will repost with the results. Wish me luck! And until then, as always…

Happy eatings, and happy reading!

Photos from my Panda-Devil-Making Adventures

Microwave the milk and eggs.

Add sugar and yeast to the mixture; stir briefly, and allow yeast to do yeasty things. (i.e. this is the “proofing” stage to make sure your yeast is active.)

Cut your dough into three pieces–two that are roughly the same size, and one that is 1/3 the size of either of the other two. These will be your three colored pieces.

Place one of the large pieces in a lightly-greased bowl and cover with warm, damp towel. Set aside in a warm place. (I placed mine in the oven, which I had allowed to heat for just a few seconds before this.)

Work green gel food coloring into your other large piece of dough. I would used a considerable amount of food coloring (at least 15 drops for this dough–you’ll probably want to use even more to achieve a brighter green color). When you finish, set aside in another lightly-greased large bowl, cover, and place in warm spot.

Work the cocoa/water mixture into your final small piece of dough. If your dough gets sticky, add a bit more flour as needed. When you’ve achieved a nice dark brown color, cover in a lightly-greased bowl. Allow all of your dough to double in size (approximately 1 hour).

When your dough has all doubled, take out the plain dough and cut into three pieces (2 of the same size, and then 1 about half the size of the other two). This will be your panda face!

Chop your chocolate-colored dough into four equal pieces. Roll out two of the pieces into logs and stick them on top of a log-shaped large piece of plain dough. Then stick the smaller piece of plain dough between the chocolate ones; these are your two panda eyes and the forehead.

Using the remaining large piece of plain dough, stretch it carefully around the rest of the dough so that it locks everything into place. Divide your green dough into two pieces (1 about half the size of the other). Place remaining two chocolate logs on top of the plain dough–these will be your ears! Then place the small green log in between to keep them in place.

Finally, stretch the last piece of green dough around the whole thing–it’s a panda in a bundle!

Place your dough into a greased loaf pan and cover with damp cloth. Allow to rise for an additional 45 minutes, or until doubled in size (like this).

After baking in preheated oven for approximately 30 minutes (or until golden brown on outside), let it cool–this is important to keeping all of your bread parts together! Otherwise, the various colors might fall apart.

And there you sort of have it! Next time, I definitely need to keep better track of where I position my dough. I’m also pretty sure I flattened it at one point while I was panicking over the time (I had a dinner plan to keep in the next hour, so my dough got a little panda-handled.) I’d also use just a tad more tough for the chocolate parts, to keep the eyes and ears looking like little devilish slits.

Otherwise, I hope all of you have better luck than I did for a first try–I’ll let you know how the next attempt goes!

Panda Bread Recipe

(My experience is a severely-butchered account of a perfectly good recipe from girlversusdough)

Ingredients

  • 3 cups all-purpose flour
  • 2 1/2 tbsp sugar
  • 1 cup milk w/ 1 egg yolk (both should total 1 cup together)
  • 3/4 tbsp salt
  • 1 1/2 tbsp unsalted butter, softened
  • 1 tbsp green tea (matcha) powder mixed w/ 2 tsp hot water, OR green food coloring
  • 3 1/2 tsp cocoa powder mixed w/ 1 1/2 tsp hot water
  • 2 1/4 tsp (or 1 standard packet) active dry yeast

Directions

  1. In a small bowl, microwave milk and egg yolk for about 30 seconds, until warm to the touch but not scalding hot.
  2. Add yeast and sugar, then stir in slightly. Allow your yeast to “proof” for 5 minutes; it should start to foam and smell like bread if your yeast is active. (If your yeast is not active, you will have to throw it out and start again with a fresh package. Make sure your milk mixture is just warm enough that it will activate the yeast, but not so hot that it kills it.)
  3. Transfer mixture to a large mixing bowl. Add in butter and salt, then stir until well-combined.
  4. Add flour 1 cup at a time, until it is incorporated and the dough pulls away from the side of the bowl. Remove it from the bowl and place on a lightly-floured cutting board. Continue to knead the dough for another 5 minutes, until smooth and elastic.
  5. Divide dough into three pieces, two about equal and one about 1/3 the size of the other two.
  6. Place one of the large pieces in the stand mixer bowl and mix with green tea/water mixture OR green food coloring until desired color is reached. If your dough gets sticky, add a bit of flour.
  7. Remove dough from bowl and place in a lightly greased bowl, covered, to rise until doubled.
  8. Clean stand mixer bowl, then place smallest piece of dough in stand mixer and combine with cocoa powder/water mixture until color is blended through. Remove dough from bowl and place in a separate, lightly greased bowl, covered, to rise until doubled.
  9. Place plain piece of dough in a separate, lightly greased bowl, covered, to rise until doubled. All pieces should double in about an hour.
  10. Once dough is risen, on a floured surface, divide plain dough in thirds, with one piece being half the size of the other two (as you did before). Use one of the larger pieces to form the face. Divide the cocoa dough in quarters and use two quarters to form the eyes. Wet your fingers with water and brush it over the dough to keep the pieces sticking together.
  11. Quickly place the smallest piece of plain dough between the eyes to keep them in place. Stretch remaining piece of plain dough over the whole bread to lock everything in place.
  12. Take last two quarters of cocoa dough and form the ears.
  13. Divide green dough in two pieces, one twice the size of the other. Take the small piece to fill in the space between the ears. Brush adjoining pieces with water if needed. Take the larger piece of green dough and stretch over the whole bread to lock everything in place.
  14. Place dough in a lightly greased loaf pan, cover and let rise until doubled, about 1 hour.
  15. Meanwhile, preheat oven to 375 degrees F.
  16. Once dough is risen, bake for about 30 minutes or until golden brown on the outside (the inside should register 190 degrees F). Allow to cool completely on a cooling rack before slicing or serving.

Leave a comment

Filed under Baked Goods and Desserts, Bread